Computer Boot Sequence

Version: 3.2
Last updated: 28 July 2003
Please note that:
- This web site is not to be used for commercial purposes. I'm the only one allowed to make money out of it. :-)
- This page is best viewed in 800 x 600 and above (because the left navigation goes off the page in 640 x 480!).
- This web site is copyright protected. However, some people have simply copied the material herein and presented it as their own, which is really rather sad. So, let me make it clear that whilst I don't object to people referencing or copying the material here, they must have the decency to give this site a credit on their own sites (e.g. "thanks to the Mossywell web site"!) and to email me to let me know.
- If you do pilfer this web site and present it as your own then at the end of the day, you're only deceiving yourself. Also, although I'm not some huge multinational corporation that has a legal department with nothing better to do than generate work for itself, I might nevertheless "visit you in the small hours and put a bat up your nightdress!". [Basil Fawlty]
| If you feel that this site has been useful, and would like to make a small donation either to say thanks for the work so far (and believe me, there's been plenty of that!), or to send encouragement for its continued development, or perhaps you've serious quantities of cash burning a hole in your pocket, you might want to make a small donation via Paypal for perhaps $1 USD or so? (As you can see, I'm not very good at grovelling!) | |
| If you want to be notified of changes to this web site, enter your email address here and I'll send out update notifications to you. NOTE: I don't and will never use your email address for any other purpose than this, so it's a safe thing to do. Also, you can remove your email address if you wish. | |
This page gives an overview of the sequence a computer goes through when it's switched on. It includes some detail on such elements as BIOS, the layout of a hard disk and the boot loading programs.
The information is based on Intel (including AMD and Cyrix) computers with a single disk (although I've started to add some information about more than one disk). The process is only slightly different with more than one disk, and quite a bit different on non-Intel platforms. Where there is information that is specific to more than one hard disk, I've said so explicitly.
Much of the information here has been gleaned from experimentation, and may therefore be an over-simplification or possibly inaccurate. If you find any such inaccuracies, please let me know.
I've used the phrase "GOTCHA!" when describing something that in some way or another is not how one would imagine things might work. (I'm sure you know what I mean :) )
I've used greyscale to make identifying various parts of the hard disk easier. (Many people didn't like the colours.)
Finally, I'd like to thank the many people that have emailed me with corrections, encouragement or just popped in for a chat! So, if you've got any opinions, or suggestions, please let me know.
| 4 October 1998 | 1.0 - First Release. |
| 20 December 1998 | 1.1 - Change some colours and a few minor clarifications. |
| 22 December 1998 | 1.2 - Sorted out the frames and few more colour changes. No more 360MB floppies :) Added a section on the Boot Sector Code. |
| 03 January 1999 | 1.3 - Corrected spelling and framing. Added more information about the MBR code. |
| 09 January 1999 | 1.4 - More detail about the BIOS and the MBR. |
| 12 June 1999 | 1.5 - Added much more information about the NTLDR program and corrected more typos. Finally ran a spell checker on it! |
| 13 June 1999 | 1.5b - Re-ordered the page and sorted out the title and meta tags. |
| 28 July 1999 | 1.5c - Corrected the frames layout on some of the hyperlinks. |
| 03 April 2001 | 1.6 - Started using Cascading Style Sheets. |
| 06 April 2001 | 1.6b - Finished using Cascading Style Sheets. |
| 05 August 2001 | 1.7 - Made corrections and clarifications. Thank to Jim Burd for going through the page with a fine-toothed comb! :-) |
| 09 September 2001 | 2.0 - Added a large section on hard disk access. Earlier versions were "inaccurate" in the representation of how hard disk access worked. I've still got to add some diagrams and links within the document, and also tidy up the added section. Also, I might split out the page into sub-pages. Any thoughts? |
| 20 September 2001 | 2.1 - Tidied up the code in the new section. Just need to fill out the links now. |
| 19 December 2001 | 2.2 - Minor typos corrected. Still need to fill out the links. :-) |
| 01 April 2002 | 2.3 - Finally got around to adding the disk layout diagram, filling in the hyperlinks and correcting a couple more typos. Also took out the frames because of search engine problems. Hope that hasn't caused too many problems. |
| 03 July 2002 | 2.4 - Made my hard disk physical layout more explicit (thanks go to Dr. Jones for pointing this out). Shady cleared up what offset 13 does in the root and other directories - cheers Shady! |
| 13 July 2002 | 2.5 - Sorted out the left navigation bar. Is this an improvement? Also added a link to the disassembled MBR code. |
| 13 July 2002 | 2.5b - Got the formatting right this time (when the page is not full screen the table columns no longer overlap)! |
| 17 July 2002 | 2.6 - Thanks to Ray Knights for spotting even more typos; even when I thought I'd found them all, an eagle-eyed person finds even more! |
| 15 September 2002 | 2.7 - I thought that it was typo-free, but Bill Smith managed to spot another 6 typos! In addition, thanks to Bill, I've clarified the File System Boot Sector v Partition Boot Sector terminology. (I.e. they're the same thing!) I've also added something about the LBA / Int 13h Ext limits and corrected a bad mistake about bitwise rotation (instead of bitwise shift). Cheers, Bill! |
| 18 April 2003 | 3.0 - Finally some significant changes to talk about! 1. Changed the introductory rant. 2. After numerous emails, I've clarified the difference between assembler and machine code. 3. Yet more typos bite the dust. 4. Added more detail about clusters. 5. Started talking about FAT32 and NTFS (much more still to do on this). 6. Finally moved away from Transition DTD to Strict DTD. 7. At last: it is now print-friendly! |
| 20 April 2003 | 3.1 - Added the "email notification thing". |
| 28 July 2003 | 3.2 - Minor typographic errors cleared up. Surely there
can't be any more? :-) I’ve also made it less Windows
95/98 orientated and brought it up to Windows 2000 in places.
Yes, I know I'm still behind the times, but that happens as
you get older! Finally made the page look half decent in Netscape 7, Opera 7 and Mozilla 1.4; also fixed the floating navigation on the left in this plethora of browsers. No idea what the page does in earlier versions of these browsers though! Sadly, the print-friendly version still only works in IE. If any one has any ideas on this, I'd be pleased to hear them. The fonts in IE 5.5 and earlier are still huge, but if you have this verson of IE and you change your font size to "smaller" then you'll see the page as I do. The most significant change is the correction to how long file names are used in FAT. I've also provided a better example. Many thanks to Alf Salte for his highly detailed information about Unicode! |
These definitions are not CCITT, RFC or any other internationally recognised definitions: I just made them up. However, their purpose is to ensure that we're all talking the same language.
| Assembler Code | Sometime called "Assembly Language", this is the lowest level "readable" programming language that can be directly mapped onto machine code. Because the only conversion that is required before being understood by a CPU is conversion to binary (which happens in the CPU's in-built "assembler"), it is extremely fast. However, it is also somewhat arcane and can be very "long winded", so its use tends to be restricted to writing code that is burnt onto various integrated circuits. |
| Basic Input/Output System (BIOS) | Machine code that contains instructions for interacting with the basic hardware components of a PC such as memory and hard disk. The code is "burned" onto a chip - usually a flash EPROM memory chip. (The BIOS is not the only way to communicate with those components. Many operating systems bypass the BIOS. However, the BIOS is always used in the boot-up sequence.) |
| BIOS Parameter Block (BPB) | Part of the File System Boot Sector that contains data used by the BIOS to locate the OS loading program by reading data that specifies the disk geometry. |
| Boot Device | The physical device that contains the non-BIOS code needed to boot the computer. |
| File System | The method used to store information on the hard disk. Examples are FAT16, NTFS and HPFS. |
| File System Boot Sector | The first physical sector in a logical volume. Contains code + File System
specific information.
NOTE: I also use the term "Partition Boot Sector" to mean the same thing. |
| Logical volume | A section or sections of the hard disk that is recognised by
the operating system as being a single section. Examples are as
follows.
|
| Machine Code | The code that the CPU understands. Everything fed to the CPU ultimately has to be converted into machine code before the CPU will understand it. In modern CPUs, assembler code can be fed to the CPU because the CPU has an in-built "assembler" that can do the assembler code to machine code conversion. Machine code is actually just a sequence of binary numbers, thought it's usually written in hexadecimal to make it typographically shorter to read. |
| Master Boot Record (MBR) | First physical sector on a hard disk. Contains the MBR code + Partition Table. (Varying definitions of the MBR exist. Some commentators use the MBR just to mean the Partition Table.) |
| Partition Boot Sector | Just another name for the File System Boot Sector. (I use the two terms interchangeably on this web page.) |
| Partition Table | The table on a hard disk that contains up to 4 partition definitions. |
The term "physical sector" actually means the physical sector as presented by the BIOS to the CPU. It is not the "real" physical sector as seen by the disk controller. (That is, it does not take into account translation methods such as Large Block Addressing.)
Disk Geometry Overview
Let's start by getting an understanding of the way that a harddisk is laid out and the way that a computer accesses a hard disk.
GOTCHA! Many authors use 1 GB = 1000 MB (decimal gigabyte), others use 1 GB = 1024 MB (binary gigabyte). On this web site, I use the binary values:
- 1 MB = 1024 KB
- 1 GB = 1024 MB
Firstly, there is the real disk geometry and then there is the “real real” disk geometry! What does this mean? Basically, a hard disk contains a set of electromagnetic platters stacked on top of one another (a bit like many CDs in a stack) with a narrow gap between each platter. Each platter is usually double-sided, although for the purposes of this explanation, this makes no difference. Unlike an old vinyl record or CD, each platter has a set of concentric rings that contain the data. (Old vinyl records and CDs actually have very long spiral grooves. This makes for an excellent quiz question: how many grooves on a vinyl LP? Answer: 2; one on each side!) Each ring is then split into segments.
Remember that each platter is double sided, and each side has it's own read/write head (a bit like a vinyl record being read simultaneously on both sides by a needle). So, if you've got 4 platters, you've probably got 8 heads (beating Zaphod Beeblebrox by some considerable margin). Now, for the purposes of getting the terminology right, it's the number of heads which is important, rather than the number of platters. (After all, who cares if we've got 8 platters each with one head, or 4 platters each with 2 heads?)
So, each head reads from one of the concentric rings (technically called a "track") on the cylinder. Interestingly, all the heads move at the same time and are positioned to read or write to the same track on their respective platter. So, if head 3 is positioned to read from track 77, head 7 will also be positioned to read from track 77. Now, what do you get if you stack a load of tracks on top of one another? A cylinder! Therefore, we might say that head 3 is positioned to read from cylinder 77 (which implies that head 7 is also positioned to read from cylinder 77).
Finally, each track is split into small segments. Each segment is called a "sector".
Now that we have the description, let’s start to use the correct terminology.
| My Description So Far | Correct Terminology |
| Heads on a Platter | Head |
| A stack of Rings or "Tracks" | Cylinder |
| Segment | Sector |
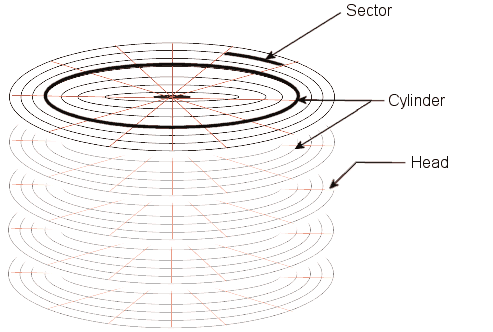
If we wanted to access one particular sector, we could reference it by specifying which head it was on, which cylinder it was on and finally which sector it was on. That would then uniquely identify the sector that we wanted to access.
How the physical disk is accessed
Knowing which sector we want to access is only part of the story. How do we actually get the disk reader to the right position physically on the disk? Somewhere in the picture, there must be some software that “knows” that if, for example, you want to access cylinder 23 then you have to move the head reader 2.5434567cm from the edge of the platter. Fortunately, such code comes with the hard disk itself. It is called the “disk controller” and it allows us to specify only the Cylinder, Head and Sector that we want to access. The disk controller calculates where the data is physically on the disk and hands the data back to us (or more accurately a pointer in memory to the data).
If that were the end of the story, we’d have a recipe for disaster. For example, one manufacturer could produce a hard disk with 125336566 cylinders, 2 heads and 198 sectors per cylinder. Another manufacturer could produce a disk with 1 cylinder, 2624626 heads and 1 sector per head (though a strange disk indeed that would be!). Therefore, a set of standards called the ATA (AT-Attachment) came into being in 1989 that effectively put a boundary on what was possible in terms of cylinder, head and sector numbers. The disk manufacturers agreed to the standards, but continued to produce disks that didn’t necessarily meet those specifications! (This isn’t actually surprising or bad because the IDE specification allows hard disks to have more sectors on the outer tracks than the inner tracks. This is called “Zone Bit Recording” or “Zone Density Recording”.) However, they compensated for the fact by getting the disk controller to “advertise” a set of parameters that met the standards, and then translated the sector requests into ones that were appropriate for the physical disk.
Therefore, only the disk controller “knows” the real real disk geometry. What most people call the real disk geometry is actually the geometry that the disk controller “pretends” to exist.
Real Geometry --> Disk Controller --> “Real real” geometry --> Physical disk
Because we don’t care what the “real real” geometry is, we can concentrate on the real geometry from now on!
The Standards
There are many standards for disk geometry, but the one pertinent to this discussion is the ATA standard. (Note: For details on individual variants of the ATA standard, such as ATA-5, see http://www.ncits.org.) This says (amongst other things) that:
- The cylinder number must be representable by 16 binary digits.
- The head number must be representable by 4 binary digits.
- The sector number must be representable by 8 binary digits.
- There are 512 bytes per sector.
This means that the maximum specification of an IDE disk that conforms to the ATA standard is as follows.
| Cylinders | 65536 (Numbered 0 to 65535) |
| Heads | 16 (Numbered 0 to 15) |
| Sectors | 256 (Numbered 0 to 255) |
| Bytes per sector | 512 |
| Total space | 128 GB |
Here's an example of a disk that meets the ATA specified limits:
Cylinder 0
| Sector: | 1 | 2 | 3 | 4 | 5 | 6 | 7 | 8 | 9 | 10 | 11 to 61 | 62 | 63 |
| Head 0 | 1 | 2 | 3 | 4 | 5 | 6 | 7 | 8 | 9 | 10 | 11 to 61 | 62 | 63 |
| Head 1 | 1 | 2 | 3 | 4 | 5 | 6 | 7 | 8 | 9 | 10 | 11 to 61 | 62 | 63 |
| Head 2 | 1 | 2 | 3 | 4 | 5 | 6 | 7 | 8 | 9 | 10 | 11 to 61 | 62 | 63 |
| Head 3 | 1 | 2 | 3 | 4 | 5 | 6 | 7 | 8 | 9 | 10 | 11 to 61 | 62 | 63 |
| Heads 4 to 13 | |||||||||||||
| Head 14 | 1 | 2 | 3 | 4 | 5 | 6 | 7 | 8 | 9 | 10 | 11 to 61 | 62 | 63 |
| Head 15 | 1 | 2 | 3 | 4 | 5 | 6 | 7 | 8 | 9 | 10 | 11 to 61 | 62 | 63 |
Cylinder 1
| Sector: | 1 | 2 | 3 | 4 | 5 | 6 | 7 | 8 | 9 | 10 | 11 to 61 | 62 | 63 |
| Head 0 | 1 | 2 | 3 | 4 | 5 | 6 | 7 | 8 | 9 | 10 | 11 to 61 | 62 | 63 |
| Head 1 | 1 | 2 | 3 | 4 | 5 | 6 | 7 | 8 | 9 | 10 | 11 to 61 | 62 | 63 |
| Head 2 | 1 | 2 | 3 | 4 | 5 | 6 | 7 | 8 | 9 | 10 | 11 to 61 | 62 | 63 |
| Head 3 | 1 | 2 | 3 | 4 | 5 | 6 | 7 | 8 | 9 | 10 | 11 to 61 | 62 | 63 |
| Heads 4 to 13 | |||||||||||||
| Head 14 | 1 | 2 | 3 | 4 | 5 | 6 | 7 | 8 | 9 | 10 | 11 to 61 | 62 | 63 |
| Head 15 | 1 | 2 | 3 | 4 | 5 | 6 | 7 | 8 | 9 | 10 | 11 to 61 | 62 | 63 |
Cylinders 2 to 6779
| Sector: | 1 | 2 | 3 | 4 | 5 | 6 | 7 | 8 | 9 | 10 | 11 to 61 | 62 | 63 |
| Head 0 | 1 | 2 | 3 | 4 | 5 | 6 | 7 | 8 | 9 | 10 | 11 to 61 | 62 | 63 |
| Head 1 | 1 | 2 | 3 | 4 | 5 | 6 | 7 | 8 | 9 | 10 | 11 to 61 | 62 | 63 |
| Head 2 | 1 | 2 | 3 | 4 | 5 | 6 | 7 | 8 | 9 | 10 | 11 to 61 | 62 | 63 |
| Head 3 | 1 | 2 | 3 | 4 | 5 | 6 | 7 | 8 | 9 | 10 | 11 to 61 | 62 | 63 |
| Heads 4 to 13 | |||||||||||||
| Head 14 | 1 | 2 | 3 | 4 | 5 | 6 | 7 | 8 | 9 | 10 | 11 to 61 | 62 | 63 |
| Head 15 | 1 | 2 | 3 | 4 | 5 | 6 | 7 | 8 | 9 | 10 | 11 to 61 | 62 | 63 |
Cylinder 6780
| Sector: | 1 | 2 | 3 | 4 | 5 | 6 | 7 | 8 | 9 | 10 | 11 to 61 | 62 | 63 |
| Head 0 | 1 | 2 | 3 | 4 | 5 | 6 | 7 | 8 | 9 | 10 | 11 to 61 | 62 | 63 |
| Head 1 | 1 | 2 | 3 | 4 | 5 | 6 | 7 | 8 | 9 | 10 | 11 to 61 | 62 | 63 |
| Head 2 | 1 | 2 | 3 | 4 | 5 | 6 | 7 | 8 | 9 | 10 | 11 to 61 | 62 | 63 |
| Head 3 | 1 | 2 | 3 | 4 | 5 | 6 | 7 | 8 | 9 | 10 | 11 to 61 | 62 | 63 |
| Heads 4 to 13 | |||||||||||||
| Head 14 | 1 | 2 | 3 | 4 | 5 | 6 | 7 | 8 | 9 | 10 | 11 to 61 | 62 | 63 |
| Head 15 | 1 | 2 | 3 | 4 | 5 | 6 | 7 | 8 | 9 | 10 | 11 to 61 | 62 | 63 |
How we used to access the disk: CHS
The original method for accessing a disk is based on asking the disk controller for the data in the appropriate Cylinder, Head and Sector. This is called the “CHS” method.
The software that we use to access the disk is called the BIOS. The BIOS is discussed in more detail later (The BIOS). However, for now, all that we need to know is that the authors of the BIOS very kindly wrote the software to communicate with the disk for us. All we have to do is tell it that, for example, we’re after Cylinder 12345, Head 3 and Sector 243 and then go off and fetch it. This piece of software within the BIOS that does the work is called an “interrupt service routine” (or “INT” as most people say). The BIOS actually contains a fair number of INTs, but the one that we’re interested in is interrupt number 19 (or 13 in hexadecimal and usually written as INT13h).
So, in assembler code, we load the CH register with the 8 low-order bit of the cylinder number, the top 2 MSB of the CL register with the remaining 2 high-order bits of the cylinder number (to give us 10 bits for the cylinder), the 6 LSB of CL is loaded with the sector number (to give us 6 bits for the sector) and DH is loaded with the head number (to give us 8 bits for the head). We load AH with the function (such as read or write) that we want to perform and then simply “run” (or call) INT13h. (In the section on the Master Boot Record, you’ll see that the Partition Table layout exactly matches this register-loading scheme. This saves time when making calls to INT13h.)
In summary, therefore, this is what happens:
O/S --> INT13h --> CHS call --> Disk Controller
Consequently, the requirements for this type of disk access are as follows:
- An operating system that can make INT13h calls.
- A BIOS that understands INT13h calls.
- A BIOS that can make CHS calls.
- A disk controller that understands the CHS values referenced.
To ensure that one INT13h was the same as any other INT13h, a set of standards were defined to ensure that the INT13h call always did the same thing independently of who wrote the BIOS. The standards are based on IBM’s BIOS for PCs written in 1981. You might think that the ATA standard (1989) matches the INT13h standard (1981). Wrong! The INT13h standard says that:
- The cylinder number must be representable by 10 binary digits.
- The head number must be representable by 8 binary digits.
- The sector number must be representable by 6 binary digits staring at 1, not 0.
- There are 512 bytes per sector.
As mentioned earlier, the Partition Table has the same set of restrictions because its layout is based on INT13h.
This means that the maximum call that can be made using INT13h is as follows.
| Cylinders | 1024 (Numbered 0 to 1023) |
| Heads | 256 (Numbered 0 to 255) |
| Sectors | 63 (GOTCHA!: Numbered 1 to 63) |
| Bytes per sector | 512 |
| Total space | 8,455,716,864 bytes = 7.875 GB |
The lowest common denominator (LCD) between INT13h and the ATA standard represents the actual calls that we can make using CHS.
| IDE/ATA (Number of bits) | INT13h - (Number of bits) | LCD - (Number of bits) | LCD (Decimal) | |
| Cylinders | 16 | 10 | 10 | 1024 --> 0 to 1023 |
| Heads | 4 | 8 | 4 | 16 --> 0 to 15 |
| Sectors | 8 | 6 | 6 | 63 --> 1 to 63 |
| Bytes per sector | 512 | 512 | 512 | 512 |
| Total space | 504 MB |
So, using CHS, only 504 MB can be accessed using this method. Until 1994, this was indeed the case: any space beyond 504 MB was lost because it simply could not be referenced. In 1994, the idea of “translation” was invented (or more accurately, put into use) whereby the real disk geometry is not that which is presented to the operating system.
Note that:
- Physical sector numbering starts with 1 whereas the other values start with 0.
- The disk fills up in the following order: Sectors, Heads, and Cylinders.
- Each physical sector has 512 bytes.
How we used to access the disk (and some still do): ECHS
The ATA standards are here to stay. Fortunately, the BIOS coders agreed on a way round the 504 MB limitation. They came up with a system called “Enhanced CHS”, or ”ECHS”.
ECHS is a simple translation method written on the end of the interrupt 19.
In summary, this is what happens:
O/S --> INT13h --> ECHS Translation --> CHS call --> Disk Controller
Consequently, the requirements for this type of disk access are as follows:
- An operating system that can make INT13h calls.
- A BIOS that understands INT13h calls.
- A BIOS that can perform the ECHS translations.
- A BIOS that can make CHS calls.
- A disk controller that understands the (translated) CHS values referenced.
As far as we’re concerned, the ECHS translation is hidden from us, so, like the disk controller, we don’t really care what it actually does to help. However, an explanation follows on what ECHS actually does.
Remember that when we make our INT13h calls, we must stick within the C:1024, H:256, S:63 boundary. So, all that ECHS does is to divide the head call that we make by either 2, 4, 8 or 16 and multiply the cylinder call that we make by the same amount. The actual multiplier (2,4, 8 or 16) that we use is chosen by the BIOS when we first install the hard disk and tell the BIOS about it. (In fact we don’t directly get to see the multiplier, but you can calculate it manually.) From there on, the multiplier doesn’t change. (Note also that the sectors are never translated and that we can assume for the purposes of the following sections that there are always 63 sectors per cylinder. Although the ATA standard allows for less (whilst still staying within the constraints of INT13h), in practice all disks present 63 sectors, and anyway if it’s never translated, it’s not very interesting to discuss!
Mathematicians may note that there is potential for loss of information because when we divide the head number that we’re after by, for example, 8, we lose the remainder of the calculation. Here’s a demonstration of this, using a multiplier of 8 as an example. Remember that we divide the head by 8 and multiply the cylinder also by 8.
| INT13h call | After translation | |
| Cylinder | 0 | 0 |
| Head | 0 | 0 |
| Cylinder | 0 | 0 |
| Head | 1 | 0 |
| Cylinder | 0 | 0 |
| Head | 2 | 0 |
| Cylinder | 0 | 0 |
| Head | 3 | 0 |
| Cylinder | : | : |
| Head | : | : |
| Cylinder | 0 | 0 |
| Head | 7 | 0 |
| Cylinder | 0 | 0 |
| Head | 8 | 1 |
| Cylinder | 0 | 0 |
| Head | 9 | 1 |
| Cylinder | : | : |
| Head | : | : |
| Cylinder | 1 | 8 |
| Head | 0 | 0 |
| Cylinder | 1 | 8 |
| Head | 1 | 0 |
| Cylinder | 1 | 8 |
| Head | 2 | 0 |
As you can see, if we make an INT13h call to C1, H1 we get given back the data in the real C8, H0. If we then want to access C1, H2 using INT13h, we also get given back the real C8, H0! Not only would this be disastrous, also note that the real cylinders 1 to 7 never get used! So, as far as I am aware, what actually happens is that the translation calculates the head first but saves the remainder of the division in the process. It then calculates the cylinder and adds to this the remainder that it saved earlier on. This is what we get.
| INT13h call | After translation | |
| Cylinder | 0 | 0 |
| Head | 0 | 0 |
| Cylinder | 0 | 1 |
| Head | 1 | 0 |
| Cylinder | 0 | 2 |
| Head | 2 | 0 |
| Cylinder | 0 | 3 |
| Head | 3 | 0 |
| Cylinder | : | : |
| Head | : | : |
| Cylinder | 0 | 7 |
| Head | 7 | 0 |
| Cylinder | 0 | 0 |
| Head | 8 | 1 |
| Cylinder | 0 | 1 |
| Head | 9 | 1 |
| Cylinder | : | : |
| Head | : | : |
| Cylinder | 1 | 8 |
| Head | 0 | 0 |
| Cylinder | 1 | 9 |
| Head | 1 | 0 |
| Cylinder | 1 | 10 |
| Head | 2 | 0 |
If you were to make a complete table for a sample hard disk, you would see that:
- We have still stayed within the INT13h constraints.
- We are using “all” the space on the hard disk (with an exception noted below).
- We are not losing data.
It is interesting to note that if I’m right about the division process, the real disk fills up in a rather curious order:
Head 0, cylinders 0 to 7; then head 1, cylinders 0 to 7; then head 2, cylinders 0 to 7 all the way up to head 15, cylinder 0 to 7. Then we go back to head 0, cylinders 8 to 15; head 1, cylinder 7 to 15 and so on.
However, because the disk controller is written to take this in consideration, we do not lose performance as a result of this disk-filling order.
The ECHS translation system still leaves 3 interesting unanswered questions.
- Is it still possible to lose disk space as a result of ECHS?
- How does the BIOS decide which multiplier to use?
- What is the maximum disk size with ECHS taken into consideration?
The first thing to remember is that when the BIOS records the disk geometry in the CMOS, it records the limits that INT13h calls can make and also the translation method to be used. Because fractions aren’t allowed, the INT13h maximum values stored are always rounded down after applying the multiplier to the disk geometry. (If they were rounded up, it would be possible to make INT13h calls that, after translation, referenced hard disk CHS values that didn’t exist on the physical disk.)
Let’s take a sample real hard disk geometry with 63 sectors per cylinder that fits within the ATA standard of:
- Cylinders: 3599 (numbered 0 to 3598)
- Heads: 16 (numbered 0 to 15)
- This gives us a total of 3627792 sectors. (A 1.7 GB disk, approximately.)
The following table shows various multipliers applied to this geometry.
| Real Geometry | x16 | x8 | x4 | x2* |
| Cylinders: 3599 (0 to 3598) | 224 | 449 | 899 | 1799 |
| Heads: 16 (0 to 15) | 256 | 128 | 64 | |
| Total Sectors | 3612672 | 3620736 | 3624768 | |
| Lost space (in sectors) | 15120 | 7056 | 3024 |
*Because the cylinder value is 1799, which is too large for INT13h, this option is not used.
The 16, 8 and 4 multipliers are all valid, but as can be seen from the table, the 4 multiplier wastes less space on the disk. Fortunately, it also ends up being the chosen multiplier! So, the rule for choosing the multiplier is: make the multiplier is as low as it can be to bring the cylinder and heads within the range permitted by INT13h (that is, 1024 cylinders numbered 0 to 1023). To achieve this, the BIOS does a simple loop (with some added error checking):
- Multiplier = 1
- Cylinder = Cylinder -1
- Is Cylinder < 1024? If not:
-
- Do a right bitwise rotation on the cylinder (i.e., divide by 2)
- Do a left bitwise rotation on the multiplier (i.e., multiply by 2)
- Use the multiplier on the Cylinder and Head values to obtain the translated values.
At the end of this loop, the multiplier will be as small as it can be to bring the cylinder to within the permitted range.
The following table gives other translation examples based on this translation algorithm. I’ve deliberately shown values that occur at “change points” and “end points”. (This is because all other web sites that I have found only demonstrate using cop-out mid range values that don’t identify what happens at the limits.)
| ATA real disk geometry | INT13h translated geometry | Lost sectors |
| 1023/16 | 1023/16 | 0 |
| 1024/16 | 1024/16 | 0 |
| 1025/16 | 512/32 | 1008 |
| 2047/16 | 1023/32 | 1008 |
| 2048/16 | 1024/32 | 0 |
| 2049/16 | 512/64 | 1008 |
| 4095/16 | 1023/64 | 3024 |
| 4096/16 | 1024/64 | 0 |
| 4097/16 | 512/128 | 1008 |
| 8191/16 | 1023/128 | 7056 |
| 8192/16 | 1024/128 | 0 |
| 8193/16 | 512/256 | 1008 |
| 16383/16 | 1023/256 | 15120 |
| 16384/16 | 1024/256 | 0 |
As can be seen, the maximum number of cylinders that can be translated is 16384. The translated geometry of C:1024, H:256 gives a maximum translated disk size of 8,455,716,864 bytes.
GOTCHA! The ATA standard actually specifies that cylinder 16384 be reserved “to support the legacy of a maintenance cylinder”. So in practice the maximum translated geometry is: C:1023, H:256, which gives a slightly lower maximum translated disk size of 8,447,459,328 bytes. You may find both values quoted as the famous “8 GB limit”.
This answers the three questions.
So, using ECHS, only roughly 7.8 GB can be accessed using this method. Any space beyond 7.8 GB would be wasted because it could not be referenced. This explains why the largest partition that Windows NT can be installed into is 7.8 GB: Windows NT relies on ECHS and INT13h during installation time to access the disk. (Once the O/S is loaded, other factors come into play. More of this later.)
How did ECHS affect DOS and Windows 95?
Unfortunately, DOS and Windows 95 cannot address a disk with 256 heads because the total number of heads (NOT the maximum value) is stored in 8 bits, giving a total number of heads of 255, not 256. The maximum translated cylinders value is therefore only 128 heads when ECHS is used. So, when running DOS and Windows 95 (but not Windows NT), the maximum space that can be addressed is 1024 cylinders x 128 heads = 4,227,858,432 bytes. This is described as the “4 GB limit”.
Two alternative methods were devised to resolve this issue:
- Revised ECHS
- LBA Assist (or Assisted LBA)
GOTHCHA! The term “LBA Assist” has very little to do with the similar term “LBA”. The former is a method of overcoming the fact that DOS and Windows can’t access a disk with 256 cylinders. The latter is a completely different translation mechanism that is described in detail later. Why use the term “LBA Assist” then? For now, it suffices to say that it’s called that because an LBA Assist translated drive is always accessed using LBA, not using any of the CHS variants. However, not all LBA accessed disks require LBA Assist translation. Mathematically speaking, LBA Assist is a subset of LBA.
How we used to access the disk: Revised ECHS
A simple way around the 256 head problem was to do a small “pre-translation” on the disk geometry when the number of heads exceeds 8192 that converts the number of heads from 16 to 15.
In summary, therefore, this is therefore what happens:
O/S --> INT13h --> ECHS Revision --> ECHS Translation --> CHS call --> Disk Controller
Consequently, the requirements for this type of disk access are as follows:
- An operating system that can make INT13h calls.
- A BIOS that understands INT13h calls.
- A BIOS that can perform the Revised ECHS translations.
- A BIOS that can make CHS calls.
- A disk controller that understands the (translated) CHS values referenced.
How is this done? The process of “pre-translation” is simple.
- If cylinders > 8192 and heads = 16
-
- Heads = 15
- Cylinders = cylinders * 16 / 15 (losing the fraction component)
- Do a standard ECHS translation
So, going back to the previous table, but this time with Revised ECHS. Note that I’ve changed the last two rows to show the new limits imposed by this scheme.
| ATA real disk geometry --> Pre-translation geometry | INT13h translated geometry | Lost sectors |
| 1023/16 | 1023/16 | 0 |
| 1024/16 | 1024/16 | 0 |
| 1025/16 | 512/32 | 1008 |
| 2047/16 | 1023/32 | 1008 |
| 2048/16 | 1024/32 | 0 |
| 2049/16 | 512/64 | 1008 |
| 4095/16 | 1023/64 | 3024 |
| 4096/16 | 1024/64 | 0 |
| 4097/16 | 512/128 | 1008 |
| 8191/16 | 1023/128 | 7056 |
| 8192/16 | 1024/128 | 0 |
| 8193/16 --> 8739/15 | 546/240 | 3024 |
| 15359/16 --> 16382/15 | 1023/240 | 14112 |
| 15360/16 --> 16384/15 | 1024/240 | 0 |
Therefore, using revised ECHS, we can address a maximum of 1024 cylinders x 240 heads: 7,927,234,560 bytes ~ 7.4 GB. Although this is less than non-revised ECHS, it does allow DOS and Windows 95 to access far more disk space.
How we used to access the disk: Assisted LBA
The other simple way around the problem was to use a modified version of ECHS, whereby we ensure that instead of 256 heads being the largest, use 255 instead. Amazingly simple really! This means that the following translated head values are allowed: 1,2, 4, 8, 16, 32, 64, 128 and 255.
So, this is what happens with Assisted LBA (and note the LBA call):
O/S --> INT13h --> LBA Assist Translation --> LBA call --> Disk Controller
Consequently, the requirements for this type of disk access are as follows:
- An operating system that can make INT13h calls.
- A BIOS that understands INT13h calls.
- A BIOS that can perform the LBA Assist translations.
- A BIOS that can make LBA calls. (Described later.)
- A disk controller that understands the LBA values referenced. (Described later.)
The BIOS achieves assisted LBA using the following algorithm.
- If cylinders > 8192
-
- Variable CH = Total Sectors / 63
- Divide (CH – 1) by 1024 (as an assembler bitwise right shift) and add 1
- Round the result up to the nearest of 16, 32, 64, 128 and 255. This is the value to be used for the number of heads.
- Divide CH by the number of heads. This is the value to be used for the number of cylinders.
So, back to the ECHS table above, but this time with LBA Assist. I’ve changed the last two rows again to show the new limits imposed by this scheme.
| ATA real disk geometry | LBA Assist translated geometry | Lost sectors |
| 1023/16 | 1023/16 | 0 |
| 1024/16 | 1024/16 | 0 |
| 1025/16 | 512/32 | 1008 |
| 2047/16 | 1023/32 | 1008 |
| 2048/16 | 1024/32 | 0 |
| 2049/16 | 512/64 | 1008 |
| 4095/16 | 1023/64 | 3024 |
| 4096/16 | 1024/64 | 0 |
| 4097/16 | 512/128 | 1008 |
| 8191/16 | 1023/128 | 7056 |
| 8192/16 | 1024/128 | 0 |
| 8193/16 | 514/255 | 1134 |
| 16319/16 | 1023/255 | 15057 |
| 16320/16 | 1024/255 | 0 |
Therefore, using Assisted LBA, we can address a maximum of 1024 cylinders x 255 heads: 8,422,686,720 bytes, which is 495,452,160 bytes more than Revised ECHS. This is certainly more disk-efficient than Revised ECHS!
How we used to access the disk: LBA
We’re nearly at the part that explains when happens with hard disks these days! So far, I’ve discussed CHS, ECHS, Revised ECHS, LBA Assist and also mentioned in passing LBA where I said that Assisted LBA as a translation mechanism relies on a disk-accessed method called “LBA”.
We’ve hit a number of barriers in the size of hard disks, the last two of which were around the 8 GB mark. Overcoming this limit could, in theory, be achieved by using ECHS multipliers of 32 or 64, which would keep the INT13h calls within C:1024 and H:256 and the ATA calls within C:65536 and H:16. However, a more radical approach was taken which ultimately (thought not initially) changed the way that hard disks were accessed. This radical solution was in two complimentary parts. The first part of the radical solution is Logical Block Addressing (LBA). (The term “block” can be used synonymously with “sector”.) The second part of the radical solution is described later.
The five most important things to note about LBA are:
- LBA is not the same as LBA Assist. The latter is a subset of the former and is a translation method based on the CHS addressing scheme.
- LBA was not (as many web sites claim) invented to overcome any disk size limits. In fact, there is nothing intrinsic to LBA that allows size limits to be overcome. It is simply a different way of accessing the hard disk.
- Unlike CHS and ECHS, both of which require the BIOS to know the disk geometry (the cylinder, head and sector values) in order to access the disk, LBA does not require the BIOS to know anything about the disk geometry to access the disk.
- The operating system still has to make INT13h calls and is therefore still bounded by the old INT13h limits.
- LBA has been around since around 1981. It is the method used to access SCSI drives. However, in the mid-1990s IDE disks finally caught up with SCSI and started to use LBA as well.
Basically, LBA numbers the sectors from 0 upwards in a linear sequence (e.g. from 0 to 876458). Simple really! It “sits” between the INT13h and the disk controller.
The LBA standard says (amongst other things) that:
- The logical block address must be representable by 64 binary digits.
- (Nothing else relavant to this explantion!)
Without doing the sums, it should be clear that LBA has a fair amount of longevity built into it. E.g. my 60 GB disk would use up only 27 of the 64 digits available!
So, this is what happens with LBA:
O/S --> INT13h --> LBA Assist Translation --> LBA call --> Disk Controller
Notice that this sequence of events is the same as in the previous section and is just repeated here for completeness.
Consequently, the requirements for LBA disk access are as follows:
- An operating system that can make INT13h calls.
- A BIOS that understands INT13h calls.
- A BIOS that can perform the LBA Assist translations.
- A BIOS that can make LBA calls.
- A disk controller that understands the LBA values referenced.
GOTCHA!: Note that the operating system is still making INT13h calls and therefore the extra capacity built into LBA cannot be referenced using this scheme. This is why LBA per se does not overcome any disk size limits.
Before looking at the formula, and its implications, for LBA, it is worth answering the question of what happens when the BIOS and hard disk support both ECHS and LBA and the hard disk is less than 8 GB? In theory, either system could be chosen. The answer is that it depends on the BIOS. Some BIOSes will always select LBA if it can (for reasons that will be explained later). Other (particularly older BIOSes) will only select LBA if you ask them to. It is often said that LBA is faster than ECHS. This is not necessarily true. Both translation systems have to perform calculations based on the requested CHS values. However, due to certain O/S features, LBA has the potential to be faster, but this is more a function of the O/S than LBA itself.
The formula used to translate the CHS value into an LBA value is as follows. Firstly, the total disk size.
- LBA(Total) = C x H x S (as expected)
Next, the referenced sector:
LBA(Referenced) = (s – 1) + (h x S) + (c x S x H)
Where:
C is Total Cylinders
H is Total Heads
S is Total Sectors
c = Cylinder being referenced
h = Head being referenced
s = Sector being referenced
There are 2 important implications of LBA:
- The order that the disk is filled is: Sectors, then Heads then Cylinders. This is what you’d probably expect to happen.
- No (or very little) space is wasted in LBA translation: the total number of blocks is simply the product of the cylinder, head and sector values.
The disk size restrictions are identical to the previous section on LBA Assist, but are repeated here for completeness.
| ATA real disk geometry | LBA Assist translated geometry | Lost sectors |
| 1023/16 | 1023/16 | 0 |
| 1024/16 | 1024/16 | 0 |
| 1025/16 | 512/32 | 1008 |
| 2047/16 | 1023/32 | 1008 |
| 2048/16 | 1024/32 | 0 |
| 2049/16 | 512/64 | 1008 |
| 4095/16 | 1023/64 | 3024 |
| 4096/16 | 1024/64 | 0 |
| 4097/16 | 512/128 | 1008 |
| 8191/16 | 1023/128 | 7056 |
| 8192/16 | 1024/128 | 0 |
| 8193/16 | 514/255 | 1134 |
| 16319/16 | 1023/255 | 15057 |
| 16320/16 | 1024/255 | 0 |
Therefore, because we’re still using Assisted LBA, we can address a maximum of 1024 cylinders x 255 heads: 8,422,686,720 bytes.
LBA Example
We can now complete the picture of LBA access using INT13h calls. We’ll use a disk with the following real geometry as an example:
- Cylinders: 16400
- Heads: 16
- Sectors: 63
We’ve told our BIOS to use LBA Assist as the translation method (which implies that we’ll also use LBA as the disk access method, of course).
The LBA Assist will present a disk geometry of the following to the operating system.
- Cylinders: 1024
- Heads: 255
- Sectors: 63
Clearly, we’ve lost the last 80 real cylinders because the number of cylinders exceeded the maximum of 16320. This is an example of why disk space is lost with operating systems that rely on INT13h calls. Anyway, let’s continue.
The operating system requires, for example, to read from the following location.
- Cylinder: 512
- Heads: 200
- Sectors: 44
It loads the appropriate CPU registers (described here) and makes the INT13h call.
The BIOS receives the calls and performs the LBA address calculation:
LBA = (44 – 1) + (200 x 63) + (512 x 63 x 255) = 8,237,923
The BIOS makes an LBA call of 8,237,923 to the disk controller and retrieves the data.
How we now access the disk: LBA and Extended INT13h
At last we’ve got to the section that explains what happens in modern PCs, which is the second part of the radical solution referenced above. In every situation described above, there has been an 8 GB (roughly) limit on the hard disk size. The limit is due to the limitations of INT13h. With the best translation systems available, the 8 GB limit still exists. Therefore, a fundamental change was required: the BIOS Extensions. In combination with LBA, the BIOS Extensions allows disks greater than 8 GB to be accessed.
The BIOS extensions are a series of additions to the “old” Interrupt Service Routines which allows wider functionality. In the case of hard disk access, we’re interested in the “INT13h Extensions”.
The INT13h extensions allow the full 64 bit LBA address to be accessed directly rather than having to mess around with CHS addresses. Because CHS values are no longer being used, the INT13h limits are no longer an issue.
So, in assembler code, we load the DS:SI pointer register with the address of a 16 byte “address packet”. The address packet contains a few things, but most importantly, the last 8 bytes specify the LBA sector that we wish to access. (Remember that an LBA address is 64 bits, or 8 bytes.) We load AH with the function (such as read or write) that we want to perform and then simply “run” (or call) INT13h. The AH that we specified in this call differs from the AH value that we would use in a standard CHS call.
So, this is what happens with LBA and INT13h Extensions in combination:
O/S --> INT13h Extended call --> LBA call --> Disk Controller
Note the absence of CHS values.
Consequently, the requirements for LBA/INT13h Extended disk access are as follows:
- An operating system that can make Extended INT13h (LBA) calls.
- A BIOS that understands Extended INT13h (LBA) calls.
- A BIOS that can make LBA calls.
- A disk controller that understands the LBA values referenced.
Therefore, in order for a disk of more than 8 GB to be recognised, all three of the operating system, the BIOS and the disk itself must all understand LBA addressing. Also, the operating system and the BIOS must also understand INT13h Extensions.
Does this means that the operating system doesn’t even get to see and CHS values? Actually, no, it doesn’t mean that. The disk controller will always present a set of CHS values to the BIOS even when they don’t actually get used. The reason is that the controller cannot make any assumptions on the capabilities of the operating system (though it does find out what the BIOS is capable of), which may not have LBA/INT13h Extensions capabilities.
The CHS values used follow a set of rules defined in the more recent ATA standards. (In fact, the set of rules have changed through the various revisions of the ATA standards. The most recent is presented here.)
- Any attempt to access beyond 15,481,935 sectors must be done using LBA. (Interestingly, 15,481,935 = 63 x 15 x 16383.) This rule keeps us well clear of any Revised ECHS or LBA Assist limits.
- If 1,032,192 (504 MB) < Total Sectors <= 16,514,064 (~7.8 GB), the maximum value for the Cylinders is 16383 (assuming that the Heads is 16). (Interestingly, 16,514,064 = 63 x 16 x 16383.) This rule basically says that if the disk is within the 7.8 GB limit, the number of cylinders can be calculated accordingly to minimise lost space.
- If Total Sectors > 15,481,935 and the device supports CHS (which it invariably will), then Cylinders = 16383. This rule sets a safe upper limit on the number of cylinders for CHS access.
- If Total Sectors <= 8,257,536, then 3 <= Heads <= 16. This rule in effect says that it’s OK to use 128 heads and 1024 cylinders on disks that are under the 4 GB limit.
- If Total Sectors > 16,514,064, then 3 <= Heads <= 15. This rule says that for disks above the 7.8 GB limit, only advertise a maximum of 15 heads. Combining this rule with the 3rd rule above: if the disk is more than 7.8 GB, then 15 heads and 16383 cylinders will be advertised.
- If Total Sectors > 1,032,192, then Sectors = 63. Combining this rule with the 3rd and 5th rules above, if the disk is more than 7.8 GB, 15 heads, 16383 cylinders and 63 sectors will be advertised. This sets an upper limit of 7,926,750,720 bytes (~7.38 GB) when the disk is more than 7.8 GB but the operating system doesn’t support LBA. Many questions have been asked about this limit on the news groups.
Once the disk controller has “decided” which CHS values to advertise, it hands them to the BIOS that then does an LBA Assisted translation on them for un-extended INT13h backwards compatibility. Despite this set of convoluted rules, an operating system that does understand LBA (e.g. Windows 2000) is not “fooled” by these limits.
For example, if we take my own IBM 75GXP 45 GB disk as an example.
| Disk Controller: “Real” Values | BIOS: LBA Assist translated values | O/S (which understands LBA): | |
| Total Sectors | 90060390 | 90060390 | 90060390 |
| Cylinders | 16383 | 963 | 5606 |
| Heads | 15 | 255 | 255 |
| Sectors | 63 | 63 | 63 |
If I had an O/S that didn’t understand LBA, the O/S would see the values in the “BIOS: LBA Assist” column. However, because it does understand LBA, it can calculate the “correct” cylinder value from the Total Sectors.
In summary, because we’re still can address 2^64 sectors using LBA and the Int 13h Extensions, we can address a maximum of 2^64 sectors: 9,444,732,965,739,290,427,392 bytes (given a 512 byte sector)!
Better than LBA and Extended INT13h: Direct disk access
Finally, a brief word on bypassing the BIOS altogether. Firstly, recapping the previous section, this is what happens with LBA and INT13h Extensions in combination:
O/S --> INT13h Extended call --> LBA call --> Disk Controller
Why bother with the BIOS at all if the LBA value is send straight to the BIOS and out the other side unchanged? The only reason is if the operating system doesn’t have the code within it to talk directly to the disk controller. These days, this is actually quite unusual. For example, Windows 2000 loads the drivers necessary to communicate with the disk controller directly. Consequently, the operating system can bypass the BIOS altogether (only once it has loaded to disk drivers, of course). Before the O/S is loaded, disk access is still done through the BIOS INT routines.
So with direct disk access, we have:
O/S --> LBA call --> Disk Controller
This is the fastest way to access the hard disk. (OK, it is possible to use Direct Memory Access, DMA, which is even faster, but this is really more to do with the CPU and memory than hard disk access methods and is therefore outside the scope of this document.)
Final Words on Disk Access
When going into the BIOS setup, the following disk access options are seen: NORMAL, LARGE and LBA. The following table shows what each option does.
| BIOS Setting | Translation | Disk Addressing Method |
| NORMAL | None | CHS |
| LARGE | Revised ECHS | CHS or LBA |
| LBA | LBA Assist | LBA |
Note the following:
- It is not possible to differentiate between ECHS or Revised ECHS in the BIOS setup. All modern BIOSes will do “Revised ECHS”.
- LARGE can access the disk using either CHS or LBA. Generally, if the hard disk supports LBA, the BIOS will use LBA to communicate with the disk.
Having said all of that, it's quite difficult to explain the layout of a hard disk just using the LBA address. Therefore, in explaining disk layout, I'm going to revert back to CHS terminology:
Cylinder 0
| Sector: | 1 | 2 | 3 | 4 | 5 | 6 | 7 | 8 | 9 | 10 | 11 to 61 | 62 | 63 |
| Head 0 | 1 | 2 | 3 | 4 | 5 | 6 | 7 | 8 | 9 | 10 | 11 to 61 | 62 | 63 |
| Head 1 | 1 | 2 | 3 | 4 | 5 | 6 | 7 | 8 | 9 | 10 | 11 to 61 | 62 | 63 |
| Head 2 | 1 | 2 | 3 | 4 | 5 | 6 | 7 | 8 | 9 | 10 | 11 to 61 | 62 | 63 |
| Head 3 | 1 | 2 | 3 | 4 | 5 | 6 | 7 | 8 | 9 | 10 | 11 to 61 | 62 | 63 |
| Heads 4 to 125 | |||||||||||||
| Head 126 | 1 | 2 | 3 | 4 | 5 | 6 | 7 | 8 | 9 | 10 | 11 to 61 | 62 | 63 |
| Head 127 | 1 | 2 | 3 | 4 | 5 | 6 | 7 | 8 | 9 | 10 | 11 to 61 | 62 | 63 |
Cylinder 1
| Sector: | 1 | 2 | 3 | 4 | 5 | 6 | 7 | 8 | 9 | 10 | 11 to 61 | 62 | 63 |
| Head 0 | 1 | 2 | 3 | 4 | 5 | 6 | 7 | 8 | 9 | 10 | 11 to 61 | 62 | 63 |
| Head 1 | 1 | 2 | 3 | 4 | 5 | 6 | 7 | 8 | 9 | 10 | 11 to 61 | 62 | 63 |
| Head 2 | 1 | 2 | 3 | 4 | 5 | 6 | 7 | 8 | 9 | 10 | 11 to 61 | 62 | 63 |
| Head 3 | 1 | 2 | 3 | 4 | 5 | 6 | 7 | 8 | 9 | 10 | 11 to 61 | 62 | 63 |
| Heads 4 to 125 | |||||||||||||
| Head 126 | 1 | 2 | 3 | 4 | 5 | 6 | 7 | 8 | 9 | 10 | 11 to 61 | 62 | 63 |
| Head 127 | 1 | 2 | 3 | 4 | 5 | 6 | 7 | 8 | 9 | 10 | 11 to 61 | 62 | 63 |
Cylinders 2 to 845
| Sector: | 1 | 2 | 3 | 4 | 5 | 6 | 7 | 8 | 9 | 10 | 11 to 61 | 62 | 63 |
| Head 0 | 1 | 2 | 3 | 4 | 5 | 6 | 7 | 8 | 9 | 10 | 11 to 61 | 62 | 63 |
| Head 1 | 1 | 2 | 3 | 4 | 5 | 6 | 7 | 8 | 9 | 10 | 11 to 61 | 62 | 63 |
| Head 2 | 1 | 2 | 3 | 4 | 5 | 6 | 7 | 8 | 9 | 10 | 11 to 61 | 62 | 63 |
| Head 3 | 1 | 2 | 3 | 4 | 5 | 6 | 7 | 8 | 9 | 10 | 11 to 61 | 62 | 63 |
| Heads 4 to 125 | |||||||||||||
| Head 126 | 1 | 2 | 3 | 4 | 5 | 6 | 7 | 8 | 9 | 10 | 11 to 61 | 62 | 63 |
| Head 127 | 1 | 2 | 3 | 4 | 5 | 6 | 7 | 8 | 9 | 10 | 11 to 61 | 62 | 63 |
Cylinder 846
| Sector: | 1 | 2 | 3 | 4 | 5 | 6 | 7 | 8 | 9 | 10 | 11 to 61 | 62 | 63 |
| Head 0 | 1 | 2 | 3 | 4 | 5 | 6 | 7 | 8 | 9 | 10 | 11 to 61 | 62 | 63 |
| Head 1 | 1 | 2 | 3 | 4 | 5 | 6 | 7 | 8 | 9 | 10 | 11 to 61 | 62 | 63 |
| Head 2 | 1 | 2 | 3 | 4 | 5 | 6 | 7 | 8 | 9 | 10 | 11 to 61 | 62 | 63 |
| Head 3 | 1 | 2 | 3 | 4 | 5 | 6 | 7 | 8 | 9 | 10 | 11 to 61 | 62 | 63 |
| Heads 4 to 125 | |||||||||||||
| Head 126 | 1 | 2 | 3 | 4 | 5 | 6 | 7 | 8 | 9 | 10 | 11 to 61 | 62 | 63 |
| Head 127 | 1 | 2 | 3 | 4 | 5 | 6 | 7 | 8 | 9 | 10 | 11 to 61 | 62 | 63 |
For the purpose of booting up the computer, the BIOS is used for three main functions:
- Providing a set of machine code subroutines that can be called by the operating system and whose function is to access the hardware components of the computer such as hard disk.
- Initiating the boot sequence after a hardware Reset.
- Allowing changes to the low level setup options.
The BIOS code is burned onto a Flash EPROM memory chip which is installed on the motherboard of the computer. It is not possible to modify the BIOS code. However, the BIOS code can usually be upgraded by obtaining the latest BIOS code from the company that wrote the code (such as Award or AMI), or better still from the company that manufactured the motherboard. (It is not recommended to upgrade the BIOS unless a specific problem relating to the BIOS is being encountered.)
The setup options are those that specify such things as the primary boot device, memory speed etc. They are accessed by pressing an appropriate button just after the PC is switched on. (For example, the DEL key.)
The machine code routines are contained within the BIOS. As the size of each routine differs from one BIOS to the other, a method of accessing those routines has been devised that means that the programmer does not need to know the location of the routines in memory. Instead, they are accessed by issuing a numbered software interrupt to the CPU. The number of the software interrupt issued tells the CPU which subroutine to execute. How does the CPU know where the code is in memory? The BIOS very kindly loads an "interrupt vector table" into memory, which is a mapping between the interrupt number and the location of the corresponding routine in memory. An example of such a routine is one that allows access to the hard disk: interrupt routine number 13, usually called INT 13. (More on Interrupts in a later version.)
So what happens when the computer is switched on (or more accurately, when a "Reset" is issued, as might happen when the reset button on the front of a PC is pressed)?
When a Reset is issued, components on the motherboard wait until the voltage is steady. During this time, they hold a Reset signal to the CPU to prevent it executing code. When the power supply indicates that it is steady, the Reset signal on the CPU is turned off, which allows the CPU to begin executing code. As there is nothing in memory, how can it execute code? Intel have designed their CPUs always to begin execution of code at address FFFF0. As there is only a small amount of memory between FFFF0 and FFFFF, the first instruction is a jump instruction to the main part of BIOS code which could be "anywhere" else. As well as testing and initialising the hardware in the Power On Self Test (POST), the BIOS uses INT 13 to initiate the boot sequence from the hard disk (or whatever device is specified in the BIOS setup).
In summary, the following happens when the PC is switched on and the power is steady:
- ROM BIOS (BIOS) initiates Power On Self Test (POST).
- The BIOS determines the "boot device" - normally a hard disk.
- The BIOS loads the contents of the first physical sector of the hard disk into memory (the MBR) to location 7C00 through to 7DFF.
- The BIOS instructs the CPU to execute the MBR code by issuing a jmp to location 7C00.
The MBR is always located at Cylinder 0, Head 0, and Sector 1. Let’s look again at the first cylinder (called cylinder 0).
Cylinder 0
| Sector: | 1 | 2 | 3 | 4 | 5 | 6 | 7 | 8 | 9 | 10 | 11 to 61 | 62 | 63 |
| Head 0 | 1 | 2 | 3 | 4 | 5 | 6 | 7 | 8 | 9 | 10 | 11 to 61 | 62 | 63 |
| Head 1 | 1 | 2 | 3 | 4 | 5 | 6 | 7 | 8 | 9 | 10 | 11 to 61 | 62 | 63 |
| Head 2 | 1 | 2 | 3 | 4 | 5 | 6 | 7 | 8 | 9 | 10 | 11 to 61 | 62 | 63 |
| Head 3 | 1 | 2 | 3 | 4 | 5 | 6 | 7 | 8 | 9 | 10 | 11 to 61 | 62 | 63 |
| Heads 4 to 125 | |||||||||||||
| Head 126 | 1 | 2 | 3 | 4 | 5 | 6 | 7 | 8 | 9 | 10 | 11 to 61 | 62 | 63 |
| Head 127 | 1 | 2 | 3 | 4 | 5 | 6 | 7 | 8 | 9 | 10 | 11 to 61 | 62 | 63 |
The Cylinder 0, Head 0, Sector 1 light grey box represents the location of the MBR. The "black" boxes in Cylinder 0, Head 0, Sectors 2 to 63 inclusive are unused. (This unused space is peculiar to Cylinder 0 only. Consequently, "data" starts from Cylinder 0, Head 1, Sector 1.
Remembering that the MBR is 512 bytes, let’s expand the light grey box and look inside.
| Offset | Length | Contents |
| 0 | 446 | Master Boot Record code. This section of code is responsible
for locating the partition to boot from and instructing the CPU
to continue execution from the start of the File System Boot
Sector. More on what this code does is discussed below.
This code contains such errors as "Error Loading Operating System" and "Missing Operating System". |
| 446 | 16 | First Partition Table entry. |
| 462 | 16 | Second Partition Table entry. |
| 478 | 16 | Third Partition Table entry. |
| 494 | 16 | Fourth Partition Table entry. |
| 510 | 2 | 55 AA |
The MBR code can occupy up to 446 bytes. An example of a MBR as written by Microsoft is as follows (and note that in this case, it fits into 440 bytes):
FA 33 C0 BE D0 BC 00 7C 8B F4 50 07 50 1F FB FC BF 00 06 B9 00 01 F2 A5 EA 1D 06 00 00 BE BE 07 B3 04 80 3C 80 74 0E 80 3C 00 75 1C 83 C6 10 FE CB 75 EF CD 18 8B 14 8B 4C 02 8B EE 83 C6 10 FE CB 74 1A 80 3C 00 74 F4 BE 8B 06 AC 3C 00 74 0B 56 BB 07 00 B4 0E CD 10 5E EB F0 EB FE BF 05 00 BB 00 7C B8 01 02 57 CD 13 5F 73 0C 33 C0 CD 13 4F 75 ED BE A3 06 EB D3 BE C2 06 BF FE 7D 81 3D 55 AA 75 C7 8B F5 EA 00 7C 00 00 49 6E 76 61 6C 69 64 20 70 61 72 74 69 74 69 6F 6E 20 74 61 62 6C 65 00 45 72 72 6F 72 20 6C 6F 61 64 69 6E 67 20 6F 70 65 72 61 74 69 6E 67 20 73 79 73 74 65 6D 00 4D 69 73 73 69 6E 67 20 6F 70 65 72 61 74 69 6E 67 20 73 79 73 74 65 6D 00 00 00 00 00 00
For a disassembled version of the MBR code, go to Ray Knights' Windows 95b Boot Sector page.
It is important to remember that although Microsoft wrote the above code, the code is not specific to any operating system. That is, it could be used to load Linux for example. So is the code any good? Well, it's very basic as it doesn't interact with the user! There are much better MBR codes freely available on the Internet. Two examples which interact with the user allowing them to select a Boot Sector code to load are:
- The Linux Loader LILO program - Credits to Werner Almesberger
- Ranish Partition Manager - Credits to Mikhail Ranish: Very Highly Recommended (I use it!)
The four Partition Table entries come after the MBR code. Each Partition Table entry is 16 bytes only. Using the second Partition table entry as an example, the layout of a partition table entry is as follows.
| Offset | Length | Contents |
| 462 | 1 | Bootable partition. 0=No, 128=Yes. On most hard disks, there will only be one partition marked as bootable. This field is also called the "Active Partition" field. |
| 463 | 1 | Partition starting Head. 0 to 255. |
| 464 | 6 LSB | Partition starting Physical Sector. 1 to 63 (0 being invalid). |
| 465 | 1 + 2 MSB of 464 | Partition starting Cylinder. 0 to 1023. |
| 466 | 1 | Partition File System ID. This field is an agreed list of IDs
for each operating system. Some of the Ids are used by more than
one operating system.
|
| 467 | 1 | Partition ending Head. 0 to 255 |
| 468 | 6 LSB | Partition ending Physical Sector. 1 to 63 (0 being invalid) |
| 469 | 1 + 2 MSB of 468 | Partition ending Cylinder. 0 to 1023 |
| 470 | 4 | Relative Sectors. This field is the number of Physical Sectors on the hard disk that precede the start of the partition. In the above example of 63 Physical Sectors per Head, the first partition would have a Relative Sector value of 63 because Physical Sector 1 is the MBR and Physical Sectors 2 to 63 on Head 0, Cylinder 0 are unused. |
| 474 | 4 | Number of Sectors. This field is the total number of Physical Sectors used by the partition. |
Now that we know how a hard disk is laid out and what is in the MBR, we can take a look at what happens when the MBR code is executed.
The MBR code makes use of INT 13 to read data from the hard disk when the PC is switched on. (Once the operating system is loaded, the method of accessing the hard disk can change depending on the operating system.)
- The MBR code looks at the "partition table" using INT 13 calls to find the first (there is normally only one) entry that is marked bootable.
- The MBR code identifies the physical location of the File System Boot Sector from the partition table entry.
- The MBR code transfers itself to location 0600 through to 07FF (from location 7C00) in memory and continues execution from there.
- The MBR code transfers the whole File System Boot Sector into memory to location 7C00 through to 7DFF.
- The MBR code instructs the CPU to execute the File System Boot Sector code.
- The File System Boot Sector code executes.
The actions from here on are File System dependent. Firstly, we need to look at the Boot Sector itself in more detail.
The Partition Boot Sector and Clusters
From here on, we are going to assume that the File System is FAT16.
Before looking at how the partition boot sector is laid out, we first have to understand "clusters". This is because clusters are referenced (or more accurately, the number of sectors per cluster is defined) in this part of the hard disk.
A cluster (or "allocation unit") is a contiguous collection of sectors. The number of sectors that make up a cluster is definied in the Partition Boot Sector. Consequently, it is constant within a partition. That is, if the Partition Boot Sector defines that there are 32 sectors per cluster, then there are always 32 sectors within each cluster within the partition. (Purists may note that technically, this is only true of 512 bytes sectors. However, that is almost exclusively the case these days anyway.) Other partitions, may have different numbers of sectors per cluster.
What is the significance of a cluster? A cluster is the smallest amount of disk space that a Microsoft operating system can reference. Put another way, Microsoft operating systems do not access sectors directly. Instead, they access "clusters". The key things to remember here are:
- There are many sectors per cluster. The exact number of sectors that make up a cluster is defined in the Partition Boot Sector.
- The sectors must be contiguous to form a cluster.
- Clusters themselves are adjacent and numbered in sequence, with no wasted space between the clusters. This is covered in more detail in the section The FAT in Detail.
- Microsoft operating systems see clusters, not sectors. This is for a number of reasons. The main one is that the pre-NT operating systems used 16 bits to reference a cluster. This limitation may have been because, as will be discussed later, FAT 16 also uses 16 bits to specify the number of clusters in a partition (hence the name). This meant that the highest numbered cluster that could be referenced was 1111111111111111 (binary) = 65535. Now, if the operating system accessed sectors and not clusters, it would only be able to access 512 * 65536 (as we're starting counting at 0) bytes = 32 MB. That is, the maximum disk size would be a pathetic 32 MB! If, however, sectors are clumped together into groups of 4, for example (4 sectors per cluster), then the operating system would be able to access 128 MB, and so on.
- NT, 2000 and XP use 64 bits to reference a cluster, even if the file system doesn't support this many bits. Thus, even if we specify 1 cluster per sector, the operating system could still reference 2^64 * 512 bytes = 8,192 EB (provided, of course, the file system also supported 64 bits to reference clusters),! It's not as large as that in practice due to other limits. For example, NT also uses 64 bits to store the file size in bytes. This immediately brings down the maximum file size to 2^64 bytes = 16 EB, whatever the file system. Moreover, as mentioned in the previous section, The Master Boot Record, 4 bytes are used to specify the number of sectors in the partition. This factor limits the size to 2^32 * 512 bytes = 2 TB. Windows 2000 and XP have a method called "Dynamic Volumes" to push this limit up to 256 TB. A later version of this document will discuss FAT 32, NTFS and how these affect volume and file size limits in more detail.
- Files are broken up into small pieces, each piece fitting neatly into a cluster, with any unused cluster space going to waste. As is discussed in The FAT in Detail, the clusters that make up a file do not have to be in order or contiguous. This is covered also in the section The FAT in Detail.
Continuing our discussion of the Partition Boot Sector, to find out how the boot sequence continues on a FAT 16 partition, we need to look at how the FAT 16 File System Boot Sector is laid out. The File System Boot Sector, like the MBR, sits within a single Physical Sector and is located at the very start of the partition. Taking a look at the first Cylinder (Cylinder 0) we can see where the File System Boot Sector of the first partition resides.
Cylinder 0
| Sector: | 1 | 2 | 3 | 4 | 5 | 6 | 7 | 8 | 9 | 10 | 11 to 61 | 62 | 63 |
| Head 0 | 1 | 2 | 3 | 4 | 5 | 6 | 7 | 8 | 9 | 10 | 11 to 61 | 62 | 63 |
| Head 1 | 1 | 2 | 3 | 4 | 5 | 6 | 7 | 8 | 9 | 10 | 11 to 61 | 62 | 63 |
| Head 2 | 1 | 2 | 3 | 4 | 5 | 6 | 7 | 8 | 9 | 10 | 11 to 61 | 62 | 63 |
| Head 3 | 1 | 2 | 3 | 4 | 5 | 6 | 7 | 8 | 9 | 10 | 11 to 61 | 62 | 63 |
| Heads 4 to 125 | |||||||||||||
| Head 126 | 1 | 2 | 3 | 4 | 5 | 6 | 7 | 8 | 9 | 10 | 11 to 61 | 62 | 63 |
| Head 127 | 1 | 2 | 3 | 4 | 5 | 6 | 7 | 8 | 9 | 10 | 11 to 61 | 62 | 63 |
The Cylinder 0, Head 1, Sector 1 Physical Sector is where the File System Boot Sector of the first partition resides. [Note that the File System Boot Sector can be more than one Physical Sector (although this is unusual): one of the fields within the File System Boot Sector itself defines this.]
Let’s expand this sector and look inside. (The "Offset" field in the table below is the offset from the start of the partition, NOT the hard disk.)
| Offset | Length | Contents | ||||||||||||||||||||||||||||||
| 0 | 3 | Machine code jump instruction to other code that starts just after the end of the Extended BIOS Parameter Block (Extended BPB). It enables the length of the BPB to change with different file systems. | ||||||||||||||||||||||||||||||
| 3 | 8 | OEM ID. Identifies the OS that formatted that partition. | ||||||||||||||||||||||||||||||
| 11 | 2 | Bytes Per Sector. This is the size of a Physical Sector and for most disks in use in the UK and the US, the value of this field will be 512. | ||||||||||||||||||||||||||||||
| 13 | 1 | Sectors Per Cluster. Valid values for this field are 1, 2, 4,
8, 16, 32, 64 for pre-NT systems. NT, 2000 and XP also allow 128
in this field. Because the File
Allocation Table (FAT) is limited in the number of Clusters
that it can address, larger volumes are supported by increasing
the number of Physical Sectors per Cluster. By default, the
Cluster size for a FAT volume is dependent on the size of the
volume. Because each FAT has at
most 65536 entries (each entry referring to a numbered Cluster)
and the most Physical Sectors per Cluster is 64, the most
Physical Sectors in a FAT16 partition is 65536 * 64 =
4194304. Therefore, as Physical Sector is 512 bytes, the maximum
partition size with FAT16 is 4194304 * 512 = 2 GB.
(In reality, it is possible to have 4 GB FAT partitions by setting the sectors per cluster value to 128. However, some disk utilities such as disk defragmentation utilities stop working.) When the disk is formatted, the number of Sectors per Cluster is set. The following table is used to define the default number of Sectors per Cluster at format time on FAT16. (For disks smaller than 16 MB, FAT 12 is used instead.)
|
||||||||||||||||||||||||||||||
| 14 | 2 | Reserved Sectors. This represents the number of sectors preceding the start of the first FAT, including the File System Boot Sector itself. It should always therefore have a value of at least 1. | ||||||||||||||||||||||||||||||
| 16 | 1 | FATs. This is the number of copies of the FAT table stored on the disk. The value of this field is 2 in FAT16. | ||||||||||||||||||||||||||||||
| 17 | 2 | Root Entries. This is the total number of file name entries that can be stored in the root directory of the volume. On a typical hard drive, the value of this field is 512. Note, however, that one entry is always used as a Volume Label, and that files with long file names will use up multiple entries per file. This means the largest number of files in the root directory is typically 511, but that you will run out of entries before that if long file names are used. | ||||||||||||||||||||||||||||||
| 19 | 2 | Small Sectors. This field is used to store the number of Physical Sectors on the disk if the size of the volume is small enough. For larger volumes, this field has a value of 0, and we refer instead to the "Large Sectors" value that comes later. | ||||||||||||||||||||||||||||||
| 21 | 1 | Media Descriptor. This byte provides information about the
media being used. The following table lists some of the
recognised media descriptor values and their associated media.
Note that the media descriptor byte may be associated with more
than one disk capacity.
|
||||||||||||||||||||||||||||||
| 22 | 2 | Sectors Per FAT. This is the number of sectors occupied by
each of the FATs on the volume. Given this information, together
with the number of FATs and reserved sectors listed above, we
(and therefore the OS) can compute where the root directory
begins. (Moreover, there is no entry for where the root directory
begins. The Boot Sector Code therefore has to calculate its
position.) Given the number of entries in the root directory, we
can also compute where the user data area of the disk begins.
(GOTCHA!) Note that the size of the FAT itself is variable. (More of the FAT later.) In fact the FAT is exactly as large as it needs to be when the partition is formatted using the standard formatting tools. Thus, there is no scope for hacking various hard disk values to increase the size of the partition because the FAT would also have to be extended almost certainly over-writing the root directory! Notice that I used the phrase "standard formatting tool". Why? Because some formatting tools such as found in Ranish Partition Manager allow the FAT to be created with the full 65536 entries even if the partition is smaller than this. Very useful! |
||||||||||||||||||||||||||||||
| 24 | 2 | Sectors Per Track. This value is a part of the apparent disk geometry in use when the disk was formatted. | ||||||||||||||||||||||||||||||
| 26 | 2 | Heads. This value is a part of the apparent disk geometry in use when the disk was formatted. | ||||||||||||||||||||||||||||||
| 28 | 4 | Hidden Sectors. This is the number of Physical Sectors on the disk preceding the start of the partition (that is, before the Partition Boot Sector itself). It is used during the boot sequence in order to calculate the absolute offset to the root directory and data areas. | ||||||||||||||||||||||||||||||
| 32 | 4 | Large Sectors. If the Small Sectors field is zero, this field contains the total number of sectors used by the FAT volume. |
Some additional fields follow the standard BIOS Parameter Block and constitute an "Extended BIOS Parameter Block". The next fields are:
| Offset | Length | Contents |
| 36 | 1 | Physical Driver Number. This is related to the BIOS physical drive number. Floppy drives are numbered starting with 0x00 for the A: drive, while physical hard disks are numbered starting with 0x80. Typically, you would set this value prior to issuing an INT 13 BIOS call in order to specify the device to access. The on-disk value stored in this field is typically 0x00 for floppies and 0x80 for hard disks, regardless of how many physical disk drives exist, because the value is only relevant if the device is a boot device. |
| 37 | 1 | Current Head. This is another field typically used when doing
INT 13 BIOS calls. The value would originally have been used to
store the track on which the boot record was located, but the
value stored on disk is not currently used as such. Therefore,
operating systems such as Windows NT uses this field to store two
flags:
|
| 38 | 1 | Signature. The extended boot record signature must be either 0x28 or 0x29 in order to be recognised by Windows NT. |
| 39 | 4 | ID. The ID is a random serial number assigned at format time in order to aid in distinguishing one disk from another. |
| 43 | 11 | Volume Label. This field is usually used to store the volume label. The volume label in Windows NT is stored as a special file in the root directory, however. |
| 54 | 8 | System ID. This field is either "FAT12" or "FAT16," depending on the format of the disk. |
On a bootable volume, the area following the Extended BIOS Parameter Block is typically executable boot code.
| Offset | Length | Contents |
| 62 | 448 | Executable code. This boot sector code is discussed in detail below. |
| 510 | 2 | 55 AA |
The Partition Boot Sector Code
This code is responsible for performing whatever actions are necessary to continue the bootstrap process. It is different for each operating system. Therefore, unlike the MBR code which is Operating System independent, the Boot Sector Code is Operating System dependent. However, to make it more confusing, the Boot Sector code still uses low level BIOS calls, and therefore locates programs using physical sector information. Consequently, although the Boot Sector code is operating system dependent, it is file system independent!
[More detail in future releases]
On Windows NT systems, this boot code will identify the location of the NTLDR file as follows:
- Look at the BIOS Parameter Block and Extended BIOS Parameter block on the first disk (the "boot disk").
- (GOTCHA!) Use the data to find the location of NTLDR on the first disk (even if the boot sector code is running from a different disk as might happen when you use a non-Microsoft MBR).
- Load it into memory.
- Run it.
This section of code contains such errors as "Could not find NTLDR".
(GOTCHA!) Although it looks simple enough, a consequence of the fact that it looks at the first disk is that if you are trying to install NT on the second disk and there is nowhere for the installation routine to install the Boot Sector/NTLDR (and other boot files) on the first disk (as would happen if you already had an OS installed on the first disk that NT couldn't recognise), it will error as follows: "xxxx MB disk0 at id0 on bus0 on atapi does not contain a partition suitable for starting Windows NT". (Different words for SCSI devices.) Basically the error can be translated as the boot sector code saying "I've used the data in the BIOS Parameter Block, but the partition that it references isn't one that I can boot from." Why does it fail in this way? Because the boot sector code doesn't start by saying "which disk am I running from?". Instead, it behaves like "assume I'm running from the first disk".
(GOTCHA!) In addition, there is a bug in the Boot Sector code for NT 4.0 SP3 and earlier where one of the registers overflows when calculating the location of NTLDR! The consequence is that when trying to locate NT after approximately 2GB (Microsoft state that it is exactly 2GB, although analysis of the code shows that this is an oversimplification), the files install, but the first reboot - when NT first uses the new Boot Sector code - hangs. It is fixed in SP4 and above.
Even on a non-bootable floppy disk, there is executable code in the Boot Sector. The code necessary to print the familiar message, "Non-system disk or disk error" is found on most standard MS-DOS formatted floppy disks that were not formatted with the system option. (You can deduce from this that a standard format writes the Boot Sector code, and a system format adds in the boot files such as IO.SYS.) Of course, this code varies depending on the operating system used to format the floppy. For example, a floppy formatted with NT would have the message "NTLDR is missing" embedded within it.
The FAT Locations
Immediately following the File System Boot Sector are the (usually) 2 FATs. As was mentioned before, the size of the FATs is variable. However, we can calculate the maximum size of the FATs.
- Each FAT entry is 16 bits (hence the name FAT16) = 2 bytes
- Maximum number of entries (with 16 bits) is 2^16 = 65536
- Therefore, the maximum size of each FAT is 65536 * 2 = 131072 bytes (because each entry is 2 bytes)
- Each Physical Sector is 512 bytes
Therefore, the maximum number of Physical Sectors covered by each FAT is 256.
Taking a look (again) at the first Cylinder (Cylinder 0) we can see where FATs reside in the case that they cover the maximum space. (The large grey chunks below represent the two FATs respectively.)
Cylinder 0
| Sector: | 1 | 2 | 3 | 4 | 5 | 6 | 7 | 8 | 9 | 10 | 11 to 61 | 62 | 63 |
| Head 0 | 1 | 2 | 3 | 4 | 5 | 6 | 7 | 8 | 9 | 10 | 11 to 61 | 62 | 63 |
| Head 1 | 1 | 2 | 3 | 4 | 5 | 6 | 7 | 8 | 9 | 10 | 11 to 61 | 62 | 63 |
| Head 2 | 1 | 2 | 3 | 4 | 5 | 6 | 7 | 8 | 9 | 10 | 11 to 61 | 62 | 63 |
| Head 3 | 1 | 2 | 3 | 4 | 5 | 6 | 7 | 8 | 9 | 10 | 11 to 61 | 62 | 63 |
| Head 4 | 1 | 2 | 3 | 4 | 5 | 6 | 7 | 8 | 9 | 10 | 11 to 61 | 62 | 63 |
| Head 5 | 1 | 2 | 3 | 4 | 5 | 6 | 7 | 8 | 9 | 10 | 11 to 61 | 62 | 63 |
| Head 6 | 1 | 2 | 3 | 4 | 5 | 6 | 7 | 8 | 9 | 10 | 11 to 61 | 62 | 63 |
| Head 7 | 1 | 2 | 3 | 4 | 5 | 6 | 7 | 8 | 9 | 10 | 11 to 61 | 62 | 63 |
| Head 8 | 1 | 2 | 3 | 4 | 5 | 6 | 7 | 8 | 9 | 10 | 11 to 61 | 62 | 63 |
| Head 9 | 1 | 2 | 3 | 4 | 5 | 6 | 7 | 8 | 9 | 10 | 11 to 61 | 62 | 63 |
| Head 10 | 1 | 2 | 3 | 4 | 5 | 6 | 7 | 8 | 9 | 10 | 11 to 61 | 62 | 63 |
| Head 11 | 1 | 2 | 3 | 4 | 5 | 6 | 7 | 8 | 9 | 10 | 11 to 61 | 62 | 63 |
| Heads 12 - 125 | |||||||||||||
| Head 126 | 1 | 2 | 3 | 4 | 5 | 6 | 7 | 8 | 9 | 10 | 11 to 61 | 62 | 63 |
| Head 127 | 1 | 2 | 3 | 4 | 5 | 6 | 7 | 8 | 9 | 10 | 11 to 61 | 62 | 63 |
Now let’s take a closer look at a single FAT entry by examining the Root Directory. Firstly, however, we need to add the new terminology of "Sector". So far, the phrase "Physical Sector" has been used to describe the sector number from the start of the hard disk. However, the term Sector will be used (we could use "Logical Sector" but it's too much typing!) to describe the sector number from the start of the partition. Thus, Sector 0 is actually the File System Boot Sector itself and Sector 257 is the start of the second FAT. (The size of a Physical Sector and Sector are the same.)
Immediately following the second FAT is the root directory entry. Note that:
- Each directory entry (root or otherwise) takes up 32 bytes.
- The root directory entry is nearly always 512 (length specified in the File System Boot Sector).
Therefore, the space occupied by the Root Directory is 512 * 32 bytes = 16 KB. This is equivalent to 32 Sectors.
Taking a look (again) at the first Cylinder (Cylinder 0) we can see where Root Directory resides. (The Sectors at locations Cylinder 0, Head 9, Sectors 10 to 41 respectively represent the Root Directory and the dark grey parts at the end represent data (at last!).)
Cylinder 0
| Sector: | 1 | 2 | 3 | 4 | 5 | 6 | 7 | 8 | 9 | 10 | 11 to 61 | 62 | 63 | |
| Head 0 | 1 | 2 | 3 | 4 | 5 | 6 | 7 | 8 | 9 | 10 | 11 to 61 | 62 | 63 | |
| Head 1 | 1 | 2 | 3 | 4 | 5 | 6 | 7 | 8 | 9 | 10 | 11 to 61 | 62 | 63 | |
| Head 2 | 1 | 2 | 3 | 4 | 5 | 6 | 7 | 8 | 9 | 10 | 11 to 61 | 62 | 63 | |
| Head 3 | 1 | 2 | 3 | 4 | 5 | 6 | 7 | 8 | 9 | 10 | 11 to 61 | 62 | 63 | |
| Head 4 | 1 | 2 | 3 | 4 | 5 | 6 | 7 | 8 | 9 | 10 | 11 to 61 | 62 | 63 | |
| Head 5 | 1 | 2 | 3 | 4 | 5 | 6 | 7 | 8 | 9 | 10 | 11 to 61 | 62 | 63 | |
| Head 6 | 1 | 2 | 3 | 4 | 5 | 6 | 7 | 8 | 9 | 10 | 11 to 61 | 62 | 63 | |
| Head 7 | 1 | 2 | 3 | 4 | 5 | 6 | 7 | 8 | 9 | 10 | 11 to 61 | 62 | 63 | |
| Head 8 | 1 | 2 | 3 | 4 | 5 | 6 | 7 | 8 | 9 | 10 | 11 to 61 | 62 | 63 | |
| Head 9 | 1 | 2 | 3 | 4 | 5 | 6 | 7 | 8 | 9 | 10 | 11 to 41 | 42 to 61 | 62 | 63 |
| Head 10 | 1 | 2 | 3 | 4 | 5 | 6 | 7 | 8 | 9 | 10 | 11 to 61 | 62 | 63 | |
| Head 11 | 1 | 2 | 3 | 4 | 5 | 6 | 7 | 8 | 9 | 10 | 11 to 61 | 62 | 63 | |
| Heads 12 - 125 | ||||||||||||||
| Head 126 | 1 | 2 | 3 | 4 | 5 | 6 | 7 | 8 | 9 | 10 | 11 to 61 | 62 | 63 | |
| Head 127 | 1 | 2 | 3 | 4 | 5 | 6 | 7 | 8 | 9 | 10 | 11 to 61 | 62 | 63 | |
It is worth remembering that in this example, we have chosen 64 Sectors per cluster. The numbering of Clusters starts from 2, strangely! (Clusters 0 and 1 are technically "reserved" Clusters.) Therefore, we can see that the data section starts in the following location:
- Cylinder 0, Head 9, Physical Sector 42; which is the same as:
- Sector 545; which is the same as:
- Cluster 2. Yes, Cluster 2, "by definition" starts at the beginning of the data section.
Also, Cluster 2 occupies the following locations:
- Cylinder 0, Head 9, Physical Sector 42 to Cylinder 0, Head 10, Physical Sector 42 inclusive; which is the same as:
- Sector 545 to Sector 608 inclusive.
How does the concept of Clusters refer to the FAT? Let’s look at the FAT more closely to answer that question. Remember that there are up to 65536 FAT entries, each one 2 bytes long. Each one is logically numbered from 0 upwards. Therefore, the FAT entries are from 0 to 65535. (The numbers are conceptual: that is, they’re not physically labelled on the hard disk.)
The numbering of the FAT entries also refers conceptually to the Cluster numbers. Therefore, suppose we had a file that started in Cluster 2, went through Cluster 3 and ended in Cluster 4. We would see the following in the FAT.
| FAT Entry | Decimal Value | Actual FAT value |
| 0 | - | F8 FF |
| 1 | - | FF 7F |
| 2 | 3 | 03 00 |
| 3 | 4 | 04 00 |
| 4 | 65535 | FF FF |
Therefore, the first 2 FAT entries are unused. FAT entry 2 has a value of 3. This means that the file in Cluster 2 continues on to Cluster 3. FAT entry 3 has a value of 4. This means that the file in Cluster 3 continues on to Cluster 4. FAT entry 4 has a value 65535. This means that the file in Cluster 4 ends in Cluster 4. We can summarise as follows.
- The FAT entries act as a linked list (similar to the "C" linked lists).
- The decimal value 65535 means "end of file".
- The actual FAT entry is in hexadecimal and is "reversed". This reversing is called "little endian" and it appears a lot in PCs.
- A consequence of the FAT system is that only one file or part of file can reside in any one Cluster.
- The FAT tables do not need to know the name of the file. File name is a function of the directory entry only.
The latter point means that with such large Clusters, there is great potential for wasted disk space, particularly with small files.
One more example. Suppose we have a file that goes through the following Clusters (in this order): 10, 11, 15, 13. We would see the following in the FAT.
| FAT Entry | Decimal Value | Actual FAT value |
| 9 | N/A | xx xx |
| 10 | 11 | 0B 00 |
| 11 | 15 | 0F 00 |
| 12 | N/A | xx xx |
| 13 | 65535 | FF FF |
| 14 | N/A | xx xx |
| 15 | 13 | 0D 00 |
Thus the file is valid, but has become "fragmented".
The Root and Other Directories in Detail
Short File Names
As mentioned earlier, each directory entry is 32 bytes. Ignoring long file names for the time being, let’s look at a directory entry that represents a file or directory.
| Offset | Length | Contents |
| 0 | 8 | The file 8-byte name excluding the dot and the file
extension. The value is stored as uppercase ASCII with unused
characters filled with spaces. E.g., "CONFIG" becomes:
43 4F 4E 46 49 47 20 20 |
| 8 | 3 | The file extension. The value is stored as uppercase ASCII
with unused characters filled with spaces. E.g., "SYS"
becomes:
53 59 53 |
| 11 | 1 | The single byte represents a number of flags as follows.
The 2 MSBs are not used. |
| 12 | 1 | Reserved. (00) |
| 13 | 3 | Reserved. Used by Windows 9x, NT and 2000 as the Created
Time. The time is made up as follows.
|
| 16 | 2 | Reserved. Used by Windows 9x, NT and 2000 as the Created
date. The date is made up as follows.
|
| 18 | 2 | Reserved. Used by Windows 9x, NT and 2000 as the Last
Accessed date. The date is made up as follows.
|
| 20 | 2 | Starting Cluster - High Word. The high word is formed of the top 2 high bytes of the starting cluster. The low word (the last 2) are stored in offset 26. The value is stored "backwards" (little endian) in hexadecimal. (For an example, see cluster 26.) In FAT12 and FAT16, this will be set to 00 00. |
| 22 | 2 | Modified Time. The time is made up as follows.
|
| 24 | 2 | Modified Date. The date is made up as follows.
|
| 26 | 2 | Starting Cluster. The value is stored "backwards"
(little endian) in hexadecimal. E.g., a starting Cluster of 44719
is stored as:
AF AE |
| 28 | 4 | The size of the file. The value is stored
"backwards" (little endian) in hexadecimal. E.g., a 168
byte file is stored as:
A8 00 00 00 This field is set to 00 00 00 00 for directories. |
Note that:
- The dot in the file name is not represented in the short file name directory entry (though as we’ll see, it does appear in the long file name entry).
- The maximum file size in FAT16 is FFFFFFFF = 4294967295 bytes = 4 GB – 1 byte
Long File Names
Let’s look at long file names in Windows 9x, NT and 2000. The rules are quite simple.
- The long file name directory entries immediately precede the 8.3 file name. (That is, the directory entry that precedes the 8.3 filename is assumed to be the long file name.)
- If more than one directory entry is needed for the long file name, the end of the long file names comes first, then the second-from-last and so on to the first part of the long file name.
- Each character is Unicode and two byes in length. I'm not going to go into detail about how Unicode works, but a good reference is: Unicode Home Page. For example, the Greek character lowercase mu is hexadecimal 03BC. If you’re lucky, your browser will show it here: μ
- Dots are therefore represented by hexadecimal 002E.
- Each Unicode character is actually reversed in the directory entry (i.e. it is little endian). So, the mu character would appear as BC 03 in the directory entry.
- Therefore, plain old ASCII, which is Unicode 00xx, where xx is 127 or lower, appears as 00 xx in the directory entry.
- Of the 32 bytes available, not all are used for the Unicode characters. In fact, the following byte offests are used for other things: 0, 11, 12, 13, 26 and 27. This leaves the other 26 bytes available for the Unicode characters - up to 13 of them per directory entry.
- The long file name is terminated by a nul character (00 00) unless the last character is the last character of the directory entry (in which case the nul is not required).
| Offset (decimal) | Length | Contents (hexadecimal) |
| 0 | 1 | Used as a counter to the directory entry that contains the long file name. The first entry will have a decimal value of 01 (binary 00000001), the second 02 and so on up to a maximum of 62 (binary 00111110). Thus, all counters except the last will have a binary value of 00xx xxxx where xxxxxx is a simple linear sequence starting at 1. The last entry will have a binary value of 01xx xxxx, where xxxxxx continues the numeric sequence. Therefore, where a single directory entry only is needed, the value will be 41. An example is shown in the next table. |
| 1 to 10 inclusive, 14 to 25 inclusive and 28 to 31 inclusive | 2 each | The long file name letters themselves. |
| 11 | 1 | 0F. This sets the Read Only, System, Hidden and Volume flags on the directory entry. |
| 12 | 1 | 00 - purpose unknown. |
| 13 | 1 | Varies - purpose unknown. |
| 26 | 1 | 00 - purpose unknown. |
| 27 | 1 | 00- purpose unknown. |
For example, if the long file name was (without the quotes):
"Living in the pools, they soon forget about the sea.txt"
then the following would be seen in the directory entries:
Each directory entry takes up two rows, so I've separated out each entry with a grey line. The short file name is shaded to make it more visible.
Finishing the Boot Sequence on FAT
Now that we have the details, we can see what happens when the boot sequence finishes (and where the data comes from).
- Control is passed to the start of the File System Boot Sector.
- The code jumps to the File System Boot Sector code.
- The File System Boot Sector code locates the file needed to continue the boot process. In the case of NT or Windows 95, the File System Boot Sector code locates the operating system loader directly (NTLDR and IO.SYS respectively).
- The OS loader is loaded into memory.
- The File System Boot Sector code instructs the CPU to continue by executing the OS loader code.
- The OS loader searches for other files needed to continue the boot process.
With MS-DOS, the boot process continues as follows. (With Windows 95/98, the MSDOS.SYS file has a completely different purpose as it is a text data file that contains OS specific loading information.)
- IO.SYS locates MSDOS.SYS as follows.
- IO.SYS searches the Root Directory for MSDOS.SYS and makes a note of the Starting Cluster.
- IO.SYS loads the part of MSDOS.SYS located in that cluster into memory.
- IO.SYS checks the appropriate FAT table entry for a "next in chain" link, or "end of chain (FF FF) entry", and continues to load the Cluster contents into memory until it reaches the "end of chain" entry.
- IO.SYS instructs the CPU to execute the contents of memory where the whole MSDOS.SYS is located.
- OS boot process continues in a similar manner.
When booting NT, the operating system loader is called NTLDR. Unlike IO.SYS used to boot Windows 95 and MS-DOS, NTLDR re-reads the partition table. (Remember that the Partition table is first read by the MBR code.)
One thing to note is that unlike the Boot Sector code that precedes it, NTLDR can recognise and boot off of more than one hard disk. Therefore, NTLDR does the following.
- Switch the processor to 386 mode.
- Load a simple file system reader into memory so that it can read other files in the file system. (In the case of SCSI, it loads a file called NTBOOTDD.SYS.)
- NTLDR then reads the boot.ini file into memory.
- NTLDR displays on the screen a menu based on the contents of
the boot.ini file that the user can use to select the operating
system to load.
The layout of the boot.ini file is explained (badly) in Microsoft's Knowledge Base Q102873. Here's my brief explanation for Intel computers.
The boot.ini has two sections: [boot loader] and [operating systems]. The former section specifies the default OS to load if the user lets the selection timeout, along with the timeout time itself. The latter is the meaty bit as it lists the operating systems themselves. Each menu option is represented by a single line in this section. There are two styles of line:
- multi(0)disk(0)rdisk(1)partition(2)\WINNT = " Some Text Here" is called the ARC naming style, and
- C:\BOOTSECT.ABC = "Some More Text" is the other style - I'll call it the "boot sector style" from now on.
The bit in the quotes ("Some Text Here" and "Some More Text") is what is displayed on the screen. The part before defined what is actually loaded.
Let's take the confusing ARC style first! It is split into 5 parts.
Part 1 can be the word "multi" or "scsi". multi means use the BIOS (technically INT 13 calls) to communicate with the hard disk. scsi means use scsi BIOS to communicate with the hard disk. The value following "multi" is always 0 because if NT has to boot from an IDE controller, it will only boot from the first IDE controller (starting the count from 0). The value following "scsi" is the number of the SCSI Host Bus Adapter from which to boot.
Part 2 is always "disk". If SCSI is being used, then the value following the word "disk" is the SCSI ID of the target disk from which to boot. (Easy really!) If BIOS is being used instead (that is, "multi" is on the same line), then the value is always 0.
Part 3 is always "rdisk". If SCSI is being used, the value following the word "rdisk" is the Logical Unit Number (LUN) of the disk. It is nearly always 0. If BIOS is being used, it represents the disk number on the IDE controller and therefore takes the value 0, 1, 2 or 3.
Part 4 is always "partition". NTLDR decides where the OS loading files are after the user has made a selection from the boot.ini file.
(GOTCHA!) The partition numbering starts from 1, not 0!
Part 5 is only relevant if the user selects an ARC option from the menu, so let's look at that now.
- The user selects on of the ARC options from the menu.
-
(GOTCHA!) This is the fun bit because the partition number doesn't exactly relate to the partition table ordering...
Instead, NTLDR reads the partition table from the appropriate disk (or if it's the same disk as it's running from, it re-reads the partition table) - specifically the File System ID and the Relative Sectors fields - and numbers each partition using the following logic.
- Search the Partition Table for partition File System IDs that don't equal 00 (Unused) or 05 (Extended).
- For each one found, number it sequentially starting with 1.
- Search for Partition Table again for partition File System IDs that equal 05 (Extended).
- For the first one found only, number it sequentially continuing the previous count.
Note that it will include unknown file system types (such as Linux) in the count, and that the extended partition – if present - always comes at the end. (That is, if there are two extended partitions, NTLDR ignores the second.)
For a highly contrived example:
Partition Table Entry Number Value found in the Partition Table NTLDR Sequence Number 1 05 3 2 06 1 3 05 Not Counted 4 81 2 The NTLDR Sequence Number is the number that goes in the value after the word "partition" in the boot.ini file. For example, going back the original multi(0)disk(0)rdisk(1)partition(2)\WINNT = "Text" line, and assuming the partition table above, NTLDR will:
- Go to the second disk on the IDE controller
- Look at the partition table entry with the value 81 (a Linux partition in this case).
Having decided which partition on which disk NTLDR is going to track down, it uses the Relative Sectors field to find the partition itself. (It could, of course, find itself - that is, the partition that it is currently running from.)
Part 5 of the ARC naming convention shows the location of the operating system main directory. In this example, the operating system will be located in the \WINNT directory. (Clearly this will cause a problem on a Linux partition!) Assuming this it has found a File System that it can read, NTLDR would find the NTDETECT.COM file in the root directory and the other OS files in the \WINNT directory.
- If the user instead selects on of the other style options (the "Boot Sector" style), we need to look at that instead.It is easier to understand.
-
Remember that a File System Boot sector is 512 bytes in size. The file referenced in our example C:\BOOTSECT.ABC will also be exactly 512 bytes because it is actually a "snapshot" of a file system boot sector. If a filename is not mentioned (that is C:\ on its own), NTLDR assumes the file BOOTSECT.DOS. This is because when installing NT on top of MS DOS or Windows 95, the NT installation overwrites the boot sector rendering a DOS/Windows 95 boot impossible. To prevent this happening, the installation routine takes a snapshot of the boot sector and writes it to a file called BOOTSECT.DOS before overwriting the boot sector. (We can use this to our advantage. NTLDR doesn't actually care what's in the file - it just runs it anyway.)
NTLDR simply opens the file specified within the boot.ini file (defaulting to BOOTSECT.DOS) and runs it instead. A consequence of this is that it is possible to get NTLDR to boot any operating system including Linux. All that you need is a boot sector that is valid for loading Linux, take a snapshot of it using one of the many tools available and create a file called (for example) BOOTSECT.LIN. Then you can add a line to the boot.ini like
- C:\BOOTSECT.LIN="My Linux Installation"